Author: sappelt

Master Thesis: Blockchain Reputation Oracle Networks 2

In the previous part of this two-part article series, I introduced all ingredients that are necessary to create a reputation mechanism for distributed oracle networks. We will directly continue on our journey on how to make the data supply for smart contracts a bit more secure.

The main contribution of my Master’s thesis was the identification of possible formulas that we could use to calculate the reputation of an oracle node within a distributed oracle network. By using a Blockchain and saving oracle answers to that irreversible data structure, we get a history about all answers that an oracle node gave in the past (see Figure 1). It is possible to use that history, to calculate a reputation score for a specific oracle node and thus eventually predict the future behaviour and detect malicious nodes.

Figure 1: (Numeric) oracle answers saved in a Blockchain data structure.

The main research questions of my thesis were:

  • What existing reputation mechanisms / formulas could be used for distributed oracle networks
  • What possible reputation dimensions / parameters could be used in that scenario? (Latency, speed,…)
  • What specific attack scenarios exist for a Blockchain based distributed oracle network based on existing attack scenarios for normal P2P reputation mechanisms.

References

Reputation mechanisms have a long history in P2P systems. I did a lot of research and identified three basis mechanisms:

  • Beta Reputation System: Audun Jøsang and Roslan Ismail. The beta reputation system.
  • Bayesian Reputation System: Wang and J. Vassileva. Bayesian network-based trust model.
  • Fuzzy Reputation System: Nathan Griffiths, Kuo Ming Chao, and Muhammad Younas. Fuzzy trust for peer-to-peer systems.

Maybe I will give a short introduction about these in future articles.

Parameters

The first step is to identify possible parameters / reputation dimensions for defining reputation in a distributed oracle network. Some examples will make it clearer what the term reputation dimensions or parameters mean:

  • Time in the system (how long is a node already participating in the system)
  • Last activity time (when was the last answer of a node?)
  • Quality of the provided data (relative to other answers)
  • Latency (relative to other answers)
  • Data size (is the peer only serving small requests?)

The calculation of these parameters is straightforward:

  • Time in the system: Current time – first answer time
  • Last activity time: Current time – last answer time
  • Quality: Relative distance of an answer compared to the other answers. Example
    • Real answer: 20,
    • Worst answer: 10,
    • Answer: 15 -> distance 0.5 in the linear model
  • Latency: Relative latency, starting from the first answer timestamp to the node’s answer timestamp
  • Data size: Fixed reputation step sizes Bytes, KB, MB,…

Attack Scenarios

The general known attack scenarios for reputation systems in P2P networks are:

  • Self-promotion: Giving yourself good ratings
  • Traitor: First act honestly to build a high reputation and the using this to harm the network
  • Whitewashing: Rejoin the network under a different identity to reset the reputation
  • Slandering: Give a bad rating to other participants to harm their reputation
  • DoS: Spam the network
  • Orchestrated: Combination of multiple

Simulation

To test the three proposed formulas, I set up a simulation which consists of generated answers and blocks. The simulation included 100 blocks of the format as shown in Figure 2. The included parameters were already described earlier as well as the tested formulas. I defined different scenarios testing all single reputation dimensions (quality, time in the system, activity,..) and combined them later using some predefined weighting scheme.

Figure 2: Block format of the simulation

Examples

Three examples of the reputation at certain time-steps are the time in the system (Figure 3), the quality (Figure 4) and the combined traitor scenario (Figure 4) (a peer is first providing good quality and then decreasing the quality).

Figure 3: Reputation is continuously rising the longer a peer is int he system
Figure 4: A peer is providing a constant quality of 0.6 (0.4 bad quality)
Figure 5: A traitor first provides good quality (to get a high reputation) and then provides bad quality.

Conclusion

Honestly, my research is just the beginning of a long journey and a very small piece. I simulated three possible formulas to calculate the reputation of an oracle node based on its answer history derived from the Blockchain. So what conclusions can we make from the findings in my thesis?

  • Reduction of the attack scenarios to a subset (because we use a blockchain)
    • Self-promotion only from formula exploitation
    • No collusion in the reputation distribution because the reputation is derived directly from the answer history
    • Whitewasher attack is still possible but related to the formula
    • Traitor attack is still possible
    • 51 % attack for Blockchains to manipulate the answer history is possible
  • Identification of various reputation dimensions
  • Formulas are generally usable with some tweaks, the best result was made with an extended bayes version incorporating partial reputation
  • Combination of parameters is necessary but how to weight?

I know this part was heavy, but if you are really interested, I would recommend to read my thesis. The final presentation is uploaded here:


Download the thesis:

https://1drv.ms/b/s!Anfdi0f-Wv4Hhugy8rf74-I51WuBng

Master Thesis: Blockchain Reputation Oracle Networks 1

Last year was an exciting year. In October 2018 I finally graduated from my Master’s in Computer Science. The topic of my thesis was about Blockchain / Oracle Reputation Systems. When I started to find a topic, I realised the lack of research material and references in the Blockchain space. So, I had to find a topic where I could incorporate previous research papers. 

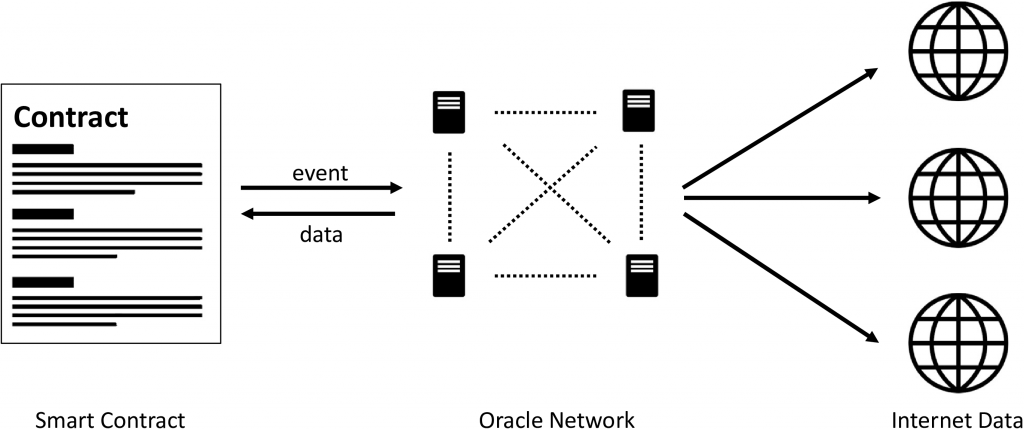
The general question for me about Blockchain and the real-world applicability of smart contract was about how it is possible to incorporate external data securely. Imagine that you want to implement a smart contract based on some external data or event and somebody manipulates that data. You will possibly trigger a payment that is irreversible. As a short wrap-up the data-feeding mechanism for smart contracts is shown in Figure 1. An external computer called oracle, fetches data from an online resource and feeds this data to a smart contract. The oracle can send data continuously or respond to events that were triggered by the smart contract.

Figure 1: Oracle feeding data to a smart contract

After digging through a lot of whitepapers dealing with oracle networks and possible security architectures, I realized that there is not a single solution, but we have to use small pieces that can make the whole system more secure. The main pieces that I identified are: 

  • Using distributed oracle networks instead of single oracles 
  • Using multiple data sources 
  • Using trusted computing environments / hardware extensions 
  • Using incentivation schemes (for acting honestly) 
  • Using reputation systems that can help both decision-making and incentivation  

To give you a better feeling about my thesis and provide a introduction, the articles are split in two. The first article (this one) will be an introduction about all parts that are necessary to understand my thesis. The second part will then present my methodology and results as well as a conclusion. 

Smart Contracts 

A smart contract is some piece of code that can enforce an agreement that is coded within it. It can be used to trigger automated payments and lives within a Blockchain. That means it is stored on all participating computing nodes and then executed redundantly on every machine. A possible architecture for the implementation of smart contracts is using a virtual machine that executes the code. A very simple example of a smart contract could be an insurance contract involving weather data. The weather report is constantly sent to the smart contract and if the weather is really bad (e.g. there is a thunderstorm), eligible customers get a compensation automatically.

External Data / Oracle Networks 

As already indicated, a real smart contract needs external data (like a weather report, betting results,…). This data could come from online sources – let’s say different weather forecast agencies. As a smart contract cannot fetch data itself yet, the data must be sent proactively by external data providers. These data providers are called oracles. An oracle is an ordinary computing device fetching data and sending it to the smart contract (see again figure 1). 

Oracle Security 

The main security threat for smart contracts is including external data, as this can trigger unwanted payments. For this issue, common projects such as TownCrier, ChainLink or Witnet suggest using hardware-based trusted computing architectures for oracle nodes. These hardware modules can run code in a secure hardware environment. However, you have to trust the hardware vendor to provide a secure architecture. Having Intel’s meltdown in mind, this was not the best solution for me, but maybe a small piece. 

Another component is the use of multiple oracles and multiple data sources. Thinking about this, an oracle network (P2P network) can be formulated itself as a Blockchain where the results of external data is stored within the Blockchain (see Figure 2). As the Blockchain is irreversible, it is always clear, which participating node gave which answer for which request. To get a better intuition, I proposed a block format in my thesis which you can see in Figure 3. The blocks contain the data (answer) for each requested data. For simplicity, I decided to use numerical data, but it wouldn’t be a problem to expand this to text data.

Figure 2: Oracle Network including various data sources
Figure 3: Possible block format for distributed oracle networks

Having a P2P oracle network that fetches data and stores the result into blocks, you might think: Why do we need all of this? The answer lies in identifying malicious peers. The main security threat for a P2P oracle network are malicious peers that either want to exploit incentivation schemes or harm the network by providing wrong data. Using a reputation mechanism, it could be possible to identify malicious peers or generate incentivation schemes that are based on the actual reputation of a peer. Coming back to my thesis, the main research questions was about formulas to measure reputation in a distributed oracle network and includes a simulation for honest and dishonest peers. This part will be explained in the next article.

Conclusion

In the first article of the two part-series, we have seen the concept of feeding data to a smart contract using oracles. As smart contracts should trigger automated payments (actually that is the idea of a programmed contract), this poses substantial security issues, regarding external data sources and oracles themselves. Solutions for this problem could be small pieces like using secure hardware architectures (mainly Intel SGX is proposed), multiple data sources and setting up a P2P oracle network where participants get an incentive for providing data. By using a Blockchain as a medium to store the node’s answers irreversibly, we get a history of a node’s answers and can use that to calculate a reputation for identifying malicious peers.

Refactoring FrozenLake to Deep Reinforcement Learning

I am really into reinforcement learning at the moment. For me it is a phantastic approach for training an AI. In the beginning, I had some trouble understanding deep q-learning compared to plain q-learning. Many tutorials go fast and start implementing deep q-learning using a CNN to solve games like doom. This is very funny, but makes it neccessary to understand CNN’s as well deeply. To get a more intuitive understanding, I wanted to implement a simpler problem that is also solvable with q-learning. View this great tutorial about q-learning first: https://medium.freecodecamp.org/diving-deeper-into-reinforcement-learning-with-q-learning-c18d0db58efe

So the idea of going deep is that the q-table gets too big, because a lot of state information is involved. Imagine the state space of a big problem. Let’s say we want to find the optimal path for delivering packets. We could assume a simplified area of 128×128 fields. We could have 20 packets to collect and to deliver. This would already result in a state space of 128x128x20x20 = 6.553.600. The actions we would imply, is simply left, up, right, down. This would result in a q-table with 6.553.600 x 4 = 26.214.400 entries.

For larger problems, this table is not storable into memory anymore. So the idea for deep q-learning is to combine deep neural networks with reinforcement learning. The q-table gets approximated by a neural network! So the idea of this tutorial is to refactor the FrozenLake problem from a q-learning approach to a deep-q-learning approach. It would be super if you did the q-learning tutorial before at https://medium.freecodecamp.org/diving-deeper-into-reinforcement-learning-with-q-learning-c18d0db58efe.

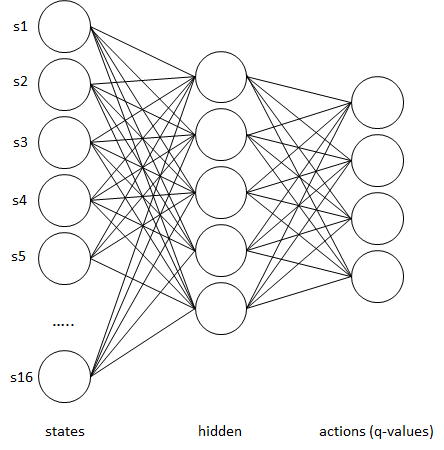
So for the frozen lake problem, we had a state space of 16, because there is a 4×4 grid involved. The actions we can do are left, up, right, down. The initalized q-table results in a 4×16 one, where the 16 rows are the states, and the 4 columns are the actions. The values are the reward, we get for a certain action:

    L U R D
S1 [0 0 0 0]
S2 [0 0 0 0]
.........

Instead of generating this table, we could use a neural network instead:

The inputs are our states, the outputs are the actual table entries. The neural network can learn these entries. To get the best action, we take the maximal q-value from the output layer. The following example is the frozen lake problem solved using deep learning, and the original file using a q-table.

Biosensing: A plantar distribution sensor

At the moment I am prototyping a lot for Enso (https://www.enso-thespaceforcreators.com), NTT Data’s co-creation space here in Munich.

One problem with innovative technology is always explaining and discussing it with clients. We are living in a fast-paced world and hear new buzzwords every day. Blockchain, Virtual Reality, AI, Biosensing, Edge Computing,… Considering different backgrounds one might think: What is this all about?

As a technologist, it is our responsibility to make the new technology understandable for everybody. Fear often occurs when we have an unclear view.

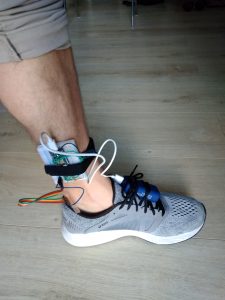
One project that I worked on the last weeks was a plantar distribution sensor that could explain the term biosensing to clients (which will be a huge trend in the next years). The prototype makes it possible to collect data about your plantar distribution using pressure sensors. A nice UI helps to turn data into knowledge by utilizing rich visualizations.

The tech stack:

  • NodeJS
  • React
  • Particle Photon
  • Plantar distribution sole from Aliexpress

Blockchained Mobility Hackathon

From July 20th to 22nd, I attended the Blockchained Mobility Hackathon organized by Datarella (http://datarella.com/blockchained-mobility-hackathon/). The list of sponsors like IOTA, BMW, VW and Bosch was quite surprising as they usually do not collaborate a lot. Thank you for the super organization and sponsorship, it was an awesome experience!

Friday 20th

On Friday, the Hackathon started with an interesting panel discussion. As I still wonder about business models for decentralized Blockchain platforms, the panel participants surprised me with their idea of a shared, decentralized mobility platform. The concept is a platform, where mobility providers can offer their services. The real driver for these changing collaborative mindset seems to be the fear of players like Uber that could dictate market rates because of their monopolistic state. Personally, I find it hard to believe that this is going to happen, as we are still lacking open API’s that could have happened 10 yrs ago. From an idealistic viewpoint, it would be fantastic for the customers as it can lower negotiation costs and simplify inter-provider communication.

One funny side note for me was the talk of the Bavarian minister for Digital Agenda, Europe and Media. He stated that digitalization is happening in every governmental department. What was again the huge function set of my digital ID? ( No offence 😉 )

Saturday 21st

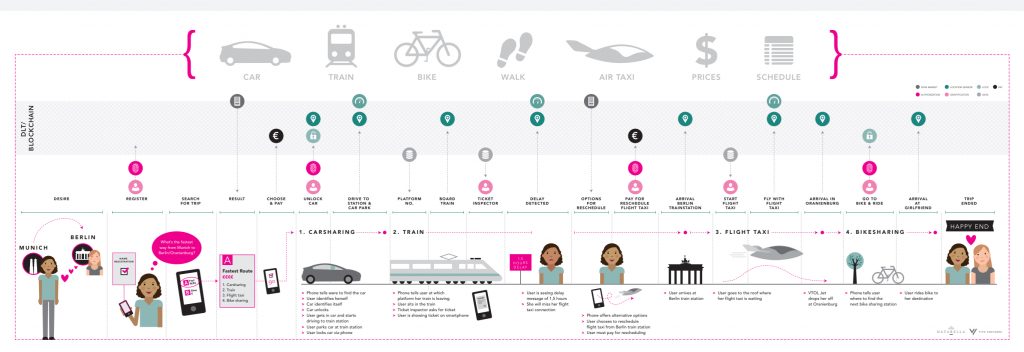
On Saturday everything was about pitching ideas that are connected to a mobility ecosystem. The image below shows a scenario, where a person wants to travel from Munich to Berlin. All information like reservations, bookings or travel information should be stored on a distributed ledger. Various use cases in that scenario could be finding and paying a car sharing, travelling by train or going by air taxi. All provider information is linked over the DL and makes an inter-provider communication possible. The overall goal should be to make the trip as easy as possible. With open providers and a shared mobility platform, the customer could have a huge benefit in simplicity.

Image Source: http://datarella.com/mobility-ecosystem/

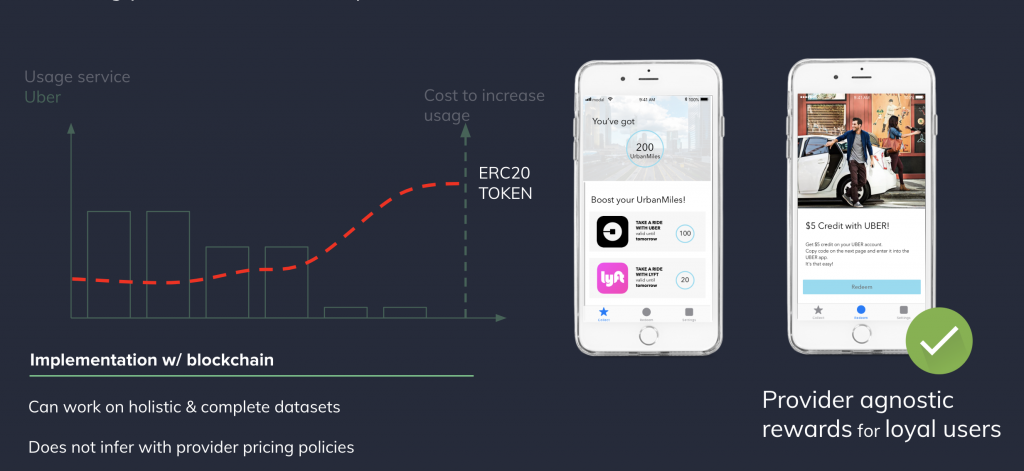
The project that I joined was an incentivization system for loyal customers. The idea is that mobility providers can offer their customers loyalty tokens (ERC20 token). The number of tokens offered is relative to the usage frequency. If you see a customers usage is slightly decreasing, you can immediately offer more tokens. The tokens should be interchangeable between multiple mobility providers, which is a huge benefit for the customer. The difference in offering him money like direct Ether is to keep the money in the mobility ecosystem, as they are only spendable for mobility services.

Sunday 22nd

After some hacking on Saturday, we could pitch our solution on Sunday. Unfortunately, we could not win with our solution. A key feature of our case was the business model behind it. The platform that we proposed could be financed by selling our loyalty tokens to mobility providers. The mobility providers could benefit from lower advertising and customer acquisition costs as they can incentivize the customer for using their service at a time when the customer acquisition costs are not that high. The less the customer is using your service, the more it will cost you to get him back.

Further Reading

You can find more blog posts (also about other projects) here:

http://datarella.com/european-mobility-players-are-getting-serious-compete-collaborate-at-blockchainedmobility-hackathon/

https://www.wired.de/article/bei-der-blockchain-wollen-volkswagen-bmw-und-co-schneller-als-die-konkurrenz-sein

Understanding Blockchain: Peer Discovery and Establishing a Connection with Python

I am always curious about how things really work. For a Blockchain, there are a lot of different modules and mechanisms involved which can be further investigated. An often asked question is, how the connection in a network like Bitcoin is established. I will walk with you through the documentation and also create a Python example on how to first find peers in the Bitcoin network and then connect to one peer.

Node Discovery

The Bitcoin documentation is pretty nice about this topic. Everything is described here: https://en.bitcoin.it/wiki/Satoshi_Client_Node_Discovery.

When you run the Bitcoin client for the first time, you have no address database saved on your local disc. Thus there has to be a mechanism how you can connect to the network for the first time. The documentation contains a list, of all steps that can be done, to know about other peers. We will use just a bunch of list items to get a feeling how it works.

  1. Nodes discover their own external address by various methods.
  2. Nodes make DNS request to receive IP addresses.
  3. Nodes can use addresses hard-coded into the software.
  4. Nodes exchange addresses with other nodes.
  5. Nodes store addresses in a database and read that database on startup.

1. Nodes discover their own external address by various methods

As Bitcoin is a P2P network when you run your client, you have in- and outgoing connections. To allow other peers to connect, you have to provide your external IP address to them. This is nothing else than navigating to a webpage like https://whatismyipaddress.com and reading your IP. As stated in the documentation, your client will try to connect to 91.198.22.70 (checkip.dyndns.org) on port 80 (https://en.bitcoin.it/wiki/Satoshi_Client_Node_Discovery#Local_Client.27s_External_Address). Try it yourself in Python:

# Import requests and regex library
import requests
import re
 
def get_external_ip():
    # Make a request to checkip.dyndns.org as proposed
    # in https://en.bitcoin.it/wiki/Satoshi_Client_Node_Discovery#DNS_Addresses
    response = requests.get('http://checkip.dyndns.org').text
 
    # Filter the response with a regex for an IPv4 address
    ip = re.search("(?:[0-9]{1,3}\.){3}[0-9]{1,3}", response).group()
    return ip
 
external_ip = get_external_ip()
print(external_ip)

2. Nodes make DNS request to receive IP addresses.

In step 1. we got our external IP address. This is necessary so that we can exchange our external address with other clients. At the moment, nobody knows about us and we have no database yet, that contains peer addresses we could connect to. We can get such a list of peers when we first start the client by making a DNS request to receive a bunch of addresses. The client is compiled (hard-coded) with the following list of DNS addresses (view https://en.bitcoin.it/wiki/Satoshi_Client_Node_Discovery#DNS_Addresses):

  • seed.bitcoin.sipa.be
  • dnsseed.bluematt.me
  • dnsseed.bitcoin.dashjr.org
  • seed.bitcoinstats.com
  • seed.bitcoin.jonasschnelli.ch
  • seed.btc.petertodd.org

If we call a DNS, we can get multiple peer addresses form it. Let’s go to https://mxtoolbox.com/DNSLookup.aspx and type in

  • seed.bitcoin.sipa.be

Can you see all the A records? It is a list of peers! So if we save a few of them, we can establish connections to that nodes.

You can do this as well programmatically in Python (Short note: this is not defensive programming, just for educational purposes):

# Import socket and time library
import socket
import time
 
def get_node_addresses():
    # The list of seeds as hardcoded in a Bitcoin client
    # view https://en.bitcoin.it/wiki/Satoshi_Client_Node_Discovery#DNS_Addresses
    dns_seeds = [
        ("seed.bitcoin.sipa.be", 8333),
        ("dnsseed.bluematt.me", 8333),
        ("dnsseed.bitcoin.dashjr.org", 8333),
        ("seed.bitcoinstats.com", 8333),
        ("seed.bitnodes.io", 8333),
        ("bitseed.xf2.org", 8333),
    ]
 
    # The list where we store our found peers
    found_peers = []
    try:
        # Loop our seed list
        for (ip_address, port) in dns_seeds:
            index = 0
            # Connect to a dns address and get the A records
            for info in socket.getaddrinfo(ip_address, port,
                                           socket.AF_INET, socket.SOCK_STREAM,
                                           socket.IPPROTO_TCP):
                # The IP address and port is at index [4][0]
                # for example: ('13.250.46.106', 8333)
                found_peers.append((info[4][0], info[4][1]))
    except Exception:
        return found_peers
 
peers = get_node_addresses()
print(peers)

3. Nodes can use addresses hard-coded into the software.

If no DNS server is available, the last method used is using some hard-coded peer addresses.

4. Nodes exchange addresses with other nodes.

When another node connects to you, or you connect to another node, you exchange IP’s. These IP’s are stored in a Database on your machine, together with a timestamp. The addresses a node has in its database, are relayed to other connected peers. This is how your local database grows.

To see how an address relay message looks like, you can refer to:

https://en.bitcoin.it/wiki/Protocol_documentation#getaddr

https://en.bitcoin.it/wiki/Satoshi_Client_Node_Discovery#Handling_Message_.22getaddr.22

5. Nodes store addresses in a database and read that database on startup.

As all the nodes you discovered from DNS and the relay messages of other peers are stored in a database, you can use that database on the next startup.

Establishing a Connection

In the previous steps, we have investigated how we get a list of node addresses, when we start our client for the first time. So no matter if we get the node’s addresses from our internal database (when we already started the client once) or we got the result from calling the DNS we want to establish a connection to a peer to exchange information an participate in the network.

Let’s establish a connection to the first responding peer:

# Connect to the first responding peer from our dns list
def connect(peer_index):
    try:
        print("Trying to connect to ", peers[peer_index])
        # Try to establish the connection
        err = sock.connect(peers[peer_index])
        return peer_index
    except Exception:
        # Somehow the peer did not respond, test the next index
        # Sidenote: Recursive call to test the next peer
        # You would it not do like this in a real world, but it is for educational purposes only
        return connect(peer_index+1)
 
peer_index = connect(0)

When we connect to another peer, we have to send a version message immediately. The format of this version message is here described https://bitcoin.org/en/developer-reference#version. It contains information, like our IP address, the client version we use, etc.

As all messages have to be converted to the binary representation, we can use the struct functions in Python (https://docs.python.org/3/library/struct.html).
The trick is here to look up the format under https://bitcoin.org/en/developer-reference#version and search the corresponding format option under https://docs.python.org/3/library/struct.html#format-characters. Let’s make an example:

The protocol on the Bitcoin website states, that we first have to provide the version:

Bytes Name Data Type Required/Optional Description
4 version int32_t Required The highest protocol version understood by the transmitting node. See the protocol version section.

The version is a 4 bytes in32_t. So what we do now, is look that up in the Python documentation. From the table, we can see the following:

i int integer 4 (3)

This means we have to call struct.pack(“i”, 70015), to get the corresponding Binary value. We proceed like this through the whole protocol (view code example).

def create_version_message():
    # Encode all values to the right binary representation on https://bitcoin.org/en/developer-reference#version
    # And https://docs.python.org/3/library/struct.html#format-characters
 
    # The current protocol version, look it up under https://bitcoin.org/en/developer-reference#protocol-versions
    version = struct.pack("i", 70015)
 
    # Services that we support, can be either full-node (1) or not full-node (0)
    services = struct.pack("Q", 0)
 
    # The current timestamp
    timestamp = struct.pack("q", int(time.time()))
 
    # Services that receiver supports
    add_recv_services = struct.pack("Q", 0)
 
    # The receiver's IP, we got it from the DNS example above
    add_recv_ip = struct.pack(">16s", bytes(peers[peer_index][0], 'utf-8'))
 
    # The receiver's port (Bitcoin default is 8333)
    add_recv_port = struct.pack(">H", 8333)
 
    # Should be identical to services, was added later by the protocol
    add_trans_services = struct.pack("Q", 0)
    # Our ip or 127.0.0.1
    add_trans_ip = struct.pack(">16s", bytes("127.0.0.1", 'utf-8'))
    # Our port
    add_trans_port = struct.pack(">H", 8333)
 
    # A nonce to detect connections to ourself
    # If we receive the same nonce that we sent, we want to connect to oursel
    nonce = struct.pack("Q", random.getrandbits(64))
    # Can be a user agent like Satoshi:0.15.1, we leave it empty
    user_agent_bytes = struct.pack("B", 0)
    # The block starting height, you can find the latest on http://blockchain.info/
    starting_height = struct.pack("i", 525453)
    # We do not relay data and thus want to prevent to get tx messages
    relay = struct.pack("?", False)
 
    # Let's combine everything to our payload
    payload = version + services + timestamp + add_recv_services + add_recv_ip + add_recv_port + \
              add_trans_services + add_trans_ip + add_trans_port + nonce + user_agent_bytes + starting_height + relay
 
    # To meet the protocol specifications, we also have to create a header
    # The general header format is described here https://en.bitcoin.it/wiki/Protocol_documentation#Message_structure
 
    # The magic bytes, indicate the initiating network (Mainnet or Testned)
    # The known values can be found here https://en.bitcoin.it/wiki/Protocol_documentation#Common_structures
    magic = bytes.fromhex("F9BEB4D9")
 
    # The command we want to send e.g. version message
    # This must be null padded to reach 12 bytes in total (version = 7 Bytes + 5 zero bytes)
    command = b"version" + 5 * b"\00"
    # The payload length
    length = struct.pack("I", len(payload))
    # The checksum, combuted as described in https://en.bitcoin.it/wiki/Protocol_documentation#Message_structure
    checksum = hashlib.sha256(hashlib.sha256(payload).digest()).digest()[:4]
 
    # Build up the message
    return magic + command + length + checksum + payload
 
# Send out our version message
sock.send(create_version_message())

Wow this was a lot! But we have our message ready and sent it out 🙂

So how do we actually know that it worked out? Well we can receive a message from the other peer and encode it again.

def encode_received_message(recv_message):
    # Encode the magic number
    recv_magic = recv_message[:4].hex()
    # Encode the command (should be version)
    recv_command = recv_message[4:16]
 
    # Encode the payload length
    recv_length = struct.unpack("I", recv_message[16:20])
 
    # Encode the checksum
    recv_checksum = recv_message[20:24]
 
    # Encode the payload (the rest)
    recv_payload = recv_message[24:]
 
    # Encode the version of the other peer
    recv_version = struct.unpack("i", recv_payload[:4])
    return (recv_magic, recv_command, recv_length, recv_checksum, recv_payload, recv_version)
 
 
time.sleep(1)
 
# Receive the message
encoded_values = encode_received_message(sock.recv(8192))
print("Version: ", encoded_values[-1])

That’s it! We have first discovered the peers in our network and then established a manual connection. Digging into this was really helpful for my personal understanding of the Bitcoin protocol. View the full code here: https://gist.github.com/sappelt/9e60af207219bfb6c6d07c6dab38bcaa

This Python bitcoind client is really helpful: https://github.com/ricmoo/pycoind

View also this video (Python 2):

Quo Vadis Blockchain?

In the past two months, I did a really deep dive into Blockchain technology. When you read about Blockchain in the news, you get the impression that everything is ready to start. You have the choice of an endless list of Blockchain providers, there is a huge number of startups in that space that draws your attention.

Actually, when you try to set up a simple project, you will figure out a lot of problems with that technology at the moment. I will do a short list of problems and thoughts that I faced on my first baby steps with blockchain.

1 Which Blockchain to use?

Let’s start with a really tough one. Which Blockchain technology should I use? There are thousands out there!

The problem here is that every startup will tell you that they did the best Blockchain. So one way to go is to look for the market capitalization and network usage. What makes a Blockchain secure is, that there are a lot of (different) miners involved, that share the mining power. So if you ask yourself that question, you will come to Bitcoin and Ethereum, as they have the biggest networks. Other possibilities are Stellar, Neo, NEM,…

Another question could be, how robust a current Blockchain technology is. Bitcoin has the longest history – Ethereum got attacked multiple times. So my personal suggestion is to choose the Blockchain that got attacked most time because only then, you can be sure that it got already more secure than Blockchains without attacks.

2 Do you really need a Blockchain?

You have to think clearly about what is your final goal. Do you really need a Blockchain for that? Think about that Blockchains are very slow due to their distributed consensus. Think about using a normal Database first. A Blockchain is only needed if you have doubts to trust the other participants. The most senseless Blockchains for me are private ones. If you want to do a business with somebody, of course, there has to be trust. So you can program your Smart Contracts just a usual (without a Blockchain), share the code with your contractor, review that and fine. No real need for a Blockchain. The only real use case in a private scenario could be security, because of decentrality. But what about spreading your infrastructure all over the globe with a lot of replications? More control for you.

3 External data

A very big problem, that you have at the moment is the use of external data in a Smart Contract. As Smart Contracts have to be deterministic for the consensus, you can not make external calls (only to other Smart Contracts) to get external data.

The only thing you can do is to build an oracle (external data service) that feeds your data into the smart contract. Of course, this is a single point of failure. So you have to use multiple oracles with multiple data sources. But what if your data source gets hacked? Do you want to trigger a payment, just because somebody fed wrong data into your contract? This is a very critical issue at the moment and a lot of startups try to work on that. At the moment, I do not know any service that is really secure. The field of external data is itself a really big area of research.

4 Scalability

Scalability is a problem that every Blockchain has at the moment. Ethereum just launches their hybrid Proof of Stake / Proof of Work network. Nobody knows really if this will work in the long term. So if somebody likes to sell you a Blockchain with Proof of Importance, Proof of Stake, Proof of Whatever, don’t rely on it. The only thing working (and tested) at the moment is simple, power wasting Proof of Work.

5 Smart Contract Security

Every few months, you will find out that there got another Smart Contract hacked. So attackers can steal all the money, connected to that Smart Contract. It is not really possible at the moment, to proof the security of a Smart Contract code. So don’t do things with an extreme amount of money. We still have to find out, how to do it in a good and secure way. An audit of your Smart Contract code is absolutely mandatory to achieve a minimum amount of security.

6 Privacy

Remember that everything on the Blockchain is completely public (and it has to be for the consensus algorithm and validation). No private customer data can be involved. So the main idea is to calculate parameters off-chain and just input the result into the Smart Contract. Different technologies are working on that problem, but nothing is really there.

7 Data Storage

Where to store your data? Storing it in a Smart Contract is super expensive! Some technologies where you can store your data (immutable) are IPFS and Ethereum Swarm. These are really in development and not production ready (IPFS is more mature). So you have to store your data in a Cloud (and your Clients have to trust you again). Also, this will yield to a single point of failure.

8 Limited Computations

When you want to do computations in a Smart Contract, you are super limited in the capabilities. First of all, computations are expensive, because they are replicated on all miner’s nodes. Secondly, even if you are willing to pay a lot for your computations, Smart Contract languages like Ethereums Solidity are absolutely limited. Even no real floating point numbers, no higher math functions etc. A solution for this could be off-chain computations as proposed by TrueBit. This is a network itself and absolutely not production ready. What to do? Calculate your stuff on your normal Cloud machines, and feed the data into your smart contract. Indeed, this is again a single point of failure and a single attack point, thus not very secure.

9 Code Immutability

In software development, we are used to fixing bug with releasing new versions. For a Blockchain Smart Contract, this is not possible as the code is immutable. So what you can do, is to use a proxy Smart Contract, that will route your requests to the most recent version of your Contract. The questions you have to ask yourself is, how to shift the state of a Smart Contract to a new one? Customers send their funds to a current version of a Smart Contract, and “sign” to that version. If you shift the funds, how about legal issues? It is indeed not the same contract, after you updated it? Also an open topic.

10 Lacking research

In the Blockchain space, you just have projects with pseudo-scientific whitepapers. Don’t take these as real research papers, because they are not. The problem at the moment is, that we have no really scientific ground for the Blockchain. There are a few base technologies underlying, but scientific publications are rare. Everything is just starting.

Summary

The life in the Blockchain space is hard but also very interesting. Nothing is really ready at the moment, the practical use is just for digital currencies in the case of Bitcoin. Everything else lacks security issues or limited capabilities. Indeed you should be aware of the future development, as the Blockchain technologies can revolutionize the whole way we deploy and manage applications. My guess is that will take 2-5 years more until we can really do something useful.

Machine learning / Price prediction of artworks / Part 2: Data Cleaning

This is another part of the series on a real machine learning project I did in university. The intention is not to write a tutorial, but provide you with hints and references on libraries and tools. Part 1 features the collection of raw data through web scraping. This part 2 will focus on how to clean the collected (raw) data. The whole project was about price prediction of artworks from the long 19th century.

Data Cleaning

When we deal with real data, it is not like playing around with toy datasets like iris. Our data will be messed up, it will have missing values, different typings, wrong information, wrong encoding etc. So what we basically have to do is to:

  1. Remove HTML tags
  2. Fix encoding
  3. Convert strings to datatypes (datetime, numbers)
  4. Normalize categories
  5. Normalize? numeric values
  6. Replace/wipe-out missing values
1. Remove HTML tags

When we are scraping from websites, we often have HTML tags included in the scraped texts. The HTML tags can help us, to recognize entity lists (<br>). Anyway, in our final data, we do not want to include HTML. A very nice python library, that helps you getting done with this is w3lib [w3lib]. It has a module HTML, that contains a function

remove_tags(htmlString)
2. Fix encoding

When dealing with artwork data, that was created all over Europe, you have artwork titles and information from different languages like German, Spanish, French or Italian. These languages contain often accents, umlauts or other special characters. Especially the artist name is difficult to group when it contains accents or other characters. A python included library called unicodedata [unicodedata] will help you out here. Import it and type

unicodedata.normalize('NFKD', text_with_accents).encode('ascii', errors='ignore')
3. Convert strings to datatypes

When you want to work with your data, it is a good thing to have uniform date and number formats. To find numbers in your text, I would recommend using simple regex [regex] expressions:

re.search("€\s([0-9]+,[0-9]+)(\s*-\s*)*([0-9]+,[0-9]+)*", rawprice)

Be aware, that you could have different number formats (, or . separator).

To parse dates, there is a super cool python library out there, which is called dateutil [dateutil]. The dateparse can make a fuzzy search within your texts, to find all dates:

parser.parse(text_including_date, fuzzy = True).year()
4. Normalize categories

The categorization of texts can be quite tricky. When we already parsed our numbers and dates, we can group on that values, which is a good thing. But what is missing, is text categories. In the case of artworks, this would be for example the artist name. We want to be able to find out the total of sales for an artist, or its total revenue. This can only be done, when all artist names are written in the same way. The problem that occurs here, is that names can have a big variety of spelling. Take Salvador Dali as an example. In the dataset, you can find the following spellings:

  • Dalí, Salvador
  • dali, salvador
  • domènech, salvador dalí
  • salvador dalí
  • salvador dali

So the first idea, that pops out is, to compare hamming distances [hamming]. For “salvador dalí” and “salvador dali”, this could really work out, but what about “domènech, salvador dalí”? For that problems, one has to be creative. In the case of artists, there exist online databases like Getty [getty] and Artnet [artnet]. These databases contain names and alternative spellings and nicknames or artists. If we look our names up here, we can simply normalize them to a default spelling. So we would head again to the step scraping, to crawl the necessary artist names.

If you have not the option to look up names in a database, the problem can get really challenging. The easiest (but not good) approach might be to use edit distances or named entity recognition approaches. If you do not want to code this up by hand, you could use fuzzy search libraries, to make matches.

5. Normalize numeric values

This is a topic that you really have to think about deeply and that has not a real recipe because it is domain dependent. You can think of doing a normalization on your numeric values, like z-score normalization or min-max-normalization. This will have different impacts on your later machine learning, and you have to try out, what works for you. A good starting point can be the tutorial on machinelearningmastery [mlmastery]

6. Replace/wipe-out missing values

For missing values, you have generally two options: You want to discard the rows in your dataset that contains missing values (which could shrink your data size extremely), or you want to replace missing values by the mean, median, min, max, or a default value.

This topic is also very domain dependent and has a huge impact on your machine learning algorithm. Generally, I would say, you should remove all entries, that do not contain your predicted value. For the other entries, you could try to run the machine learning with different normalizations and use the best one.

References

[w3lib] http://w3lib.readthedocs.io/en/latest/w3lib.html

[unicodedata] https://docs.python.org/3.6/library/unicodedata.html

[regex] https://docs.python.org/3.6/library/re.html

[dateutil] https://dateutil.readthedocs.io/en/stable/

[hamming] https://en.wikipedia.org/wiki/Hamming_distance

[getty] http://www.getty.edu/

[artnet] http://www.artnet.com/

[mlmastery] https://machinelearningmastery.com/scale-machine-learning-data-scratch-python/


ADAS Prototype for MWC ’18

I was two weeks in the Silicon Valley in January. I worked there for the NTT i3 to develop a prototype for the MWC ’18 & the NTT R&D Forum ’18.

The showcase is based on Anki Overdrive (https://www.anki.com) and has some toy cars that are driving on a track. Basically, the whole thing works over Bluetooth, so you can collect the position data and send out commands. What I built, is a collision detection for a crossing tile, an overtake when going with two cars and an obstacle detection, that can detect a tree on the road and avoids the collision on the road by instructing the car to change the lane.

The whole prototype runs on the NTT i3 edge computing device cloudwan (https://www.cloudwan.io) in a docker container. It is a Microservice application with modules for controlling the cars via Bluetooth, the Advanced Driver Assistance System (ADAS) that can avoid collisions, the object detection and a UI. The whole application is a mixture of technologies like NodeJS and Golang that communicate through WebSockets. As the cars are really fast and do a complete round in 6 seconds, the system needed quick response times.

View also my slides here:

Here is a video in action:

The whole code is available on Github at (Repositories starting with edge-*):

https://github.com/Altemista

Machine learning / Price prediction of artworks / Part 1 Scraping


I was pretty busy the last weeks, so, that is why I did not post something. As I did a full machine learning project in university, I would like to share my experiences in a four-part series with you. The whole topic of the series will be about price prediction of artworks from the so-called long 19th century (https://en.wikipedia.org/wiki/Long_nineteenth_century). This topic is especially interesting because we are dealing with raw data. Not super cleaned data sets that you push through a machine learning algorithm and get easily an accuracy of over 90%.

First of all the process will have four main parts: Scraping, Cleaning, Feature Analysis and Machine Learning. As there are perfect tutorials outside, I will not explain every step in detail, but give you references for a good start and comment my personal experiences so that you do not run into the same mistakes.

Scraping

The most basic idea to get data is to scrape websites (https://en.wikipedia.org/wiki/Web_scraping). So the idea for this project is to scrape auction house websites like Sotheby’s or Christie’s. As this could cause legal issues (https://en.wikipedia.org/wiki/Web_scraping#Legal_issues) you have to be pretty sure about the terms of usage. For this project we are especially interested in information about the price of an artwork, it’s sale date, the artist, the material, etc.

A really good tool for scraping is called “Scrapy” [Scrapy]. It comes bundled with everything that you probably need and is super fast because it is parallelizing your web requests.  It also deals with http header configuration, direct data upload to a cloud provider, checkpointing (for stopping and resuming), structuring your scraping projects etc. A very good tutorial is on Scraping is at [ScrapyTutorial]. If you walked through it, I would recommend having a look at so-called Items [ScrapyItems]. These can separate your crawling and necessary transformations.

My recommendation is really, to scrape the data raw and do all cleaning and transformation later. So you do not have to do the scraping again when you made a mistake but can rework on the raw (html) data. For real data, scraping can take up to one week or even longer.

A nice tool to find the XPATH of an element within a website is the XPath Helper Wizard [XPATH]. Simply hold the shift key (while the tool is activated) and hover over the element you want to scrape. Sometimes some handwork is needed, but you get an idea.

A row of the raw dataset could look like this:

[

{“title”: “donna al balcone”, “style”: “lithograph in colours”, “created_year”: “1956”, “size_unit”: “cm”, “height”: “65,5”, “width”: “50”, “artist_name”: “massimo campigli”, “description”: “<div style=\”line-height:18px;\”>\r\n\r\n<!– written by TX_HTML32 8.0.140.500 –>\r\n<title></title>\r\n\r\n\r\n<p>\r\n<font style=\”font-family:’Arial’;font-size:10pt;\”><b>Donna al balcone<br>\r\n</b>Lithograph in colours, 1956 . <br>\r\nMeloni/Tavola 161. Signed, dated and numbered 16/175. On Rives (with watermark). 59,5 : 38,7 cm (23,4 : 15,2 in). Sheet: 65,5 x 50 cm (25,7 x 19,6 in). <p>\r\n</p><p>\r\n</p><p>\r\nPrinted by Desjobert, Paris. Published by L’Œuvre gravé, Paris-Zürich<br>\r\nMinor light- and mount-staining. Margins with some scattered fox marks. Verso a strip of tape along the edges, glue to the mount. [HD]</p></font>\r\n </p></div>”, “sale_id”: “295”, “sale_title”: “Old Masters and Modern Art/ Marine Art”, “lot_id”: “350”, “auction_house_name”: “xy”, “image_urls”: [“http://xy.com400503194.jpg”], “currency”: “EUR”, “estimate_currency”: “EUR”, “price”: “1547”, “max_estimated_price”: “1000”, “min_estimated_price”: “1000”, “images”: [{“url”: “http:xy.com//400503194.jpg”, “path”: “full/95477903330c088065ba9e48596972471463370b.jpg”, “checksum”: “db621696c32d3f66377f3fa97128925c”}]},

….

Configuration Hints

For the projects, I needed some special configurations, that might be good to know.

Getting the API (if there is one)

A thing that I figured out, was that in the previous project there was always used HTML scraping. You should consider monitoring the requests (under Chrome Dev Tools -> Network), to find out whether there is an API to use. This is way faster than scraping HTML code.

User Agent (If you get not allowed)

Some websites are blocking the scrapy user agent. You can work around that by using the following property in settings.py

USER_AGENT = 'Mozilla/5.0 (Macintosh; Intel Mac OS X 10_10_5) AppleWebKit/537.36 (KHTML, like Gecko) Chrome/55.0.2883.95 Safari/537.36'
Google Cloud Upload

To upload your images directly to google cloud, you can use the following properties in settings.py

# This is the configuration for google cloud
ITEM_PIPELINES = {'scrapy.pipelines.images.ImagesPipeline': 1}
IMAGES_STORE = 'gs://your-gc-project-url/images'
GCS_PROJECT_ID = 'your gc project id'


SIDENOTE: You have to download your gcs api keys and do the following export before running the scraping:

export GOOGLE_APPLICATION_CREDENTIALS=google-api-keys.json

So the next part will cover the step cleaning, that will help to wipe-out html tags and do transformations on the data.

References

[Scrapy] https://scrapy.org/

[ScrapyTutorial] https://docs.scrapy.org/en/latest/intro/tutorial.html

[ScrapyItems] https://docs.scrapy.org/en/latest/topics/items.html

[XPATH] https://chrome.google.com/webstore/detail/xpath-helper-wizard/jadhpggafkbmpdpmpgigopmodldgfcki