Uncategorized

Master Thesis: Blockchain Reputation Oracle Networks 2

In the previous part of this two-part article series, I introduced all ingredients that are necessary to create a reputation mechanism for distributed oracle networks. We will directly continue on our journey on how to make the data supply for smart contracts a bit more secure.

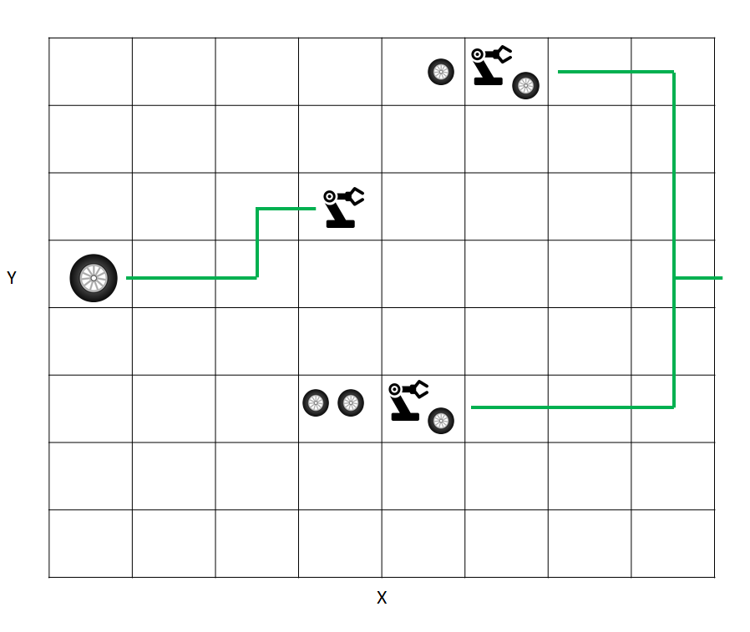
The main contribution of my Master’s thesis was the identification of possible formulas that we could use to calculate the reputation of an oracle node within a distributed oracle network. By using a Blockchain and saving oracle answers to that irreversible data structure, we get a history about all answers that an oracle node gave in the past (see Figure 1). It is possible to use that history, to calculate a reputation score for a specific oracle node and thus eventually predict the future behaviour and detect malicious nodes.

Figure 1: (Numeric) oracle answers saved in a Blockchain data structure.

The main research questions of my thesis were:

  • What existing reputation mechanisms / formulas could be used for distributed oracle networks
  • What possible reputation dimensions / parameters could be used in that scenario? (Latency, speed,…)
  • What specific attack scenarios exist for a Blockchain based distributed oracle network based on existing attack scenarios for normal P2P reputation mechanisms.

References

Reputation mechanisms have a long history in P2P systems. I did a lot of research and identified three basis mechanisms:

  • Beta Reputation System: Audun Jøsang and Roslan Ismail. The beta reputation system.
  • Bayesian Reputation System: Wang and J. Vassileva. Bayesian network-based trust model.
  • Fuzzy Reputation System: Nathan Griffiths, Kuo Ming Chao, and Muhammad Younas. Fuzzy trust for peer-to-peer systems.

Maybe I will give a short introduction about these in future articles.

Parameters

The first step is to identify possible parameters / reputation dimensions for defining reputation in a distributed oracle network. Some examples will make it clearer what the term reputation dimensions or parameters mean:

  • Time in the system (how long is a node already participating in the system)
  • Last activity time (when was the last answer of a node?)
  • Quality of the provided data (relative to other answers)
  • Latency (relative to other answers)
  • Data size (is the peer only serving small requests?)

The calculation of these parameters is straightforward:

  • Time in the system: Current time – first answer time
  • Last activity time: Current time – last answer time
  • Quality: Relative distance of an answer compared to the other answers. Example
    • Real answer: 20,
    • Worst answer: 10,
    • Answer: 15 -> distance 0.5 in the linear model
  • Latency: Relative latency, starting from the first answer timestamp to the node’s answer timestamp
  • Data size: Fixed reputation step sizes Bytes, KB, MB,…

Attack Scenarios

The general known attack scenarios for reputation systems in P2P networks are:

  • Self-promotion: Giving yourself good ratings
  • Traitor: First act honestly to build a high reputation and the using this to harm the network
  • Whitewashing: Rejoin the network under a different identity to reset the reputation
  • Slandering: Give a bad rating to other participants to harm their reputation
  • DoS: Spam the network
  • Orchestrated: Combination of multiple

Simulation

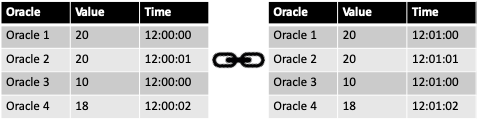
To test the three proposed formulas, I set up a simulation which consists of generated answers and blocks. The simulation included 100 blocks of the format as shown in Figure 2. The included parameters were already described earlier as well as the tested formulas. I defined different scenarios testing all single reputation dimensions (quality, time in the system, activity,..) and combined them later using some predefined weighting scheme.

Figure 2: Block format of the simulation

Examples

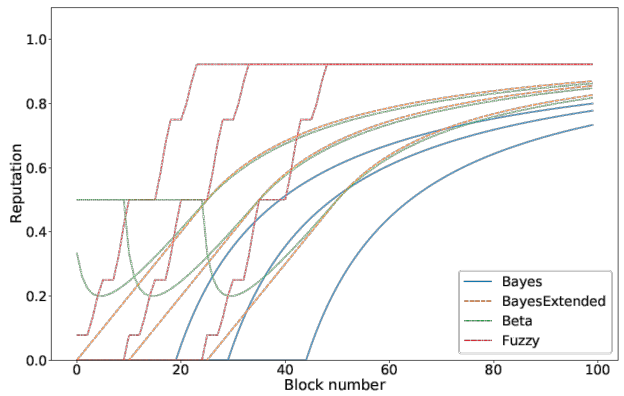
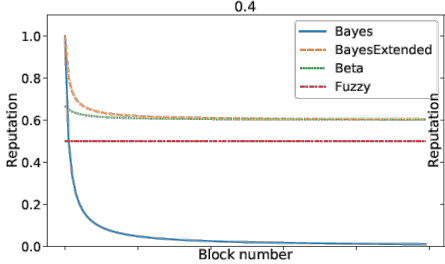
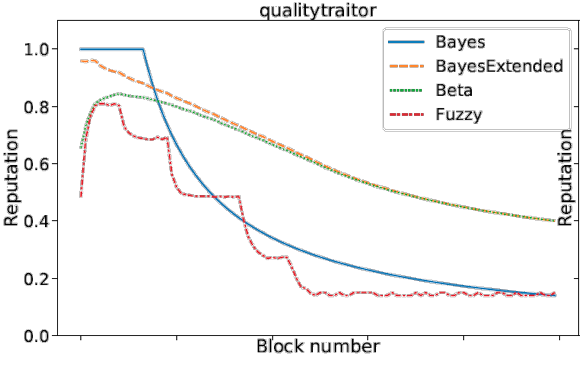
Three examples of the reputation at certain time-steps are the time in the system (Figure 3), the quality (Figure 4) and the combined traitor scenario (Figure 4) (a peer is first providing good quality and then decreasing the quality).

Figure 3: Reputation is continuously rising the longer a peer is int he system
Figure 4: A peer is providing a constant quality of 0.6 (0.4 bad quality)
Figure 5: A traitor first provides good quality (to get a high reputation) and then provides bad quality.

Conclusion

Honestly, my research is just the beginning of a long journey and a very small piece. I simulated three possible formulas to calculate the reputation of an oracle node based on its answer history derived from the Blockchain. So what conclusions can we make from the findings in my thesis?

  • Reduction of the attack scenarios to a subset (because we use a blockchain)
    • Self-promotion only from formula exploitation
    • No collusion in the reputation distribution because the reputation is derived directly from the answer history
    • Whitewasher attack is still possible but related to the formula
    • Traitor attack is still possible
    • 51 % attack for Blockchains to manipulate the answer history is possible
  • Identification of various reputation dimensions
  • Formulas are generally usable with some tweaks, the best result was made with an extended bayes version incorporating partial reputation
  • Combination of parameters is necessary but how to weight?

I know this part was heavy, but if you are really interested, I would recommend to read my thesis. The final presentation is uploaded here:


Download the thesis:

https://1drv.ms/b/s!Anfdi0f-Wv4Hhugy8rf74-I51WuBng

ADAS Prototype for MWC ’18

I was two weeks in the Silicon Valley in January. I worked there for the NTT i3 to develop a prototype for the MWC ’18 & the NTT R&D Forum ’18.

The showcase is based on Anki Overdrive (https://www.anki.com) and has some toy cars that are driving on a track. Basically, the whole thing works over Bluetooth, so you can collect the position data and send out commands. What I built, is a collision detection for a crossing tile, an overtake when going with two cars and an obstacle detection, that can detect a tree on the road and avoids the collision on the road by instructing the car to change the lane.

The whole prototype runs on the NTT i3 edge computing device cloudwan (https://www.cloudwan.io) in a docker container. It is a Microservice application with modules for controlling the cars via Bluetooth, the Advanced Driver Assistance System (ADAS) that can avoid collisions, the object detection and a UI. The whole application is a mixture of technologies like NodeJS and Golang that communicate through WebSockets. As the cars are really fast and do a complete round in 6 seconds, the system needed quick response times.

View also my slides here:

Here is a video in action:

The whole code is available on Github at (Repositories starting with edge-*):

https://github.com/Altemista

Quantum Computing: My personal perspective

Last weeks I dived deeply into the field of quantum computing. From all the current news article I had a feeling that we are making big steps forward to have working quantum computers that are usable in business use cases.

Now I know better: In quantum computing, we are currently ‘programming’ with primitive gates and solving artificial problems. Yes, these problems like Deutsch, Simon and Grover show the speedup of quantum computers, but they are totally artificial. The only really useful algorithm is, of course, Shor’s  factoring algorithm. The biggest number that could actually be factorized is 15. Yeah!

But how can quantum computers be used to speed-up current real-world problems and algorithms? In no way, because the new quantum algorithms have to exploit the nature of quantum theory. So we have to totally change our way of thinking and there will be no way to transform our current algorithms into effective quantum algorithms.

So what now? Well at the moment, the only thing is to wait.

Resources for learning about quantum computing:

  1. Umesh Varizanis Course on Quantum Computing & Quantum Mechanics:
    https://www.youtube.com/watch?v=bT5rFIZZeKI&list=PL2jykFOD1AWap0r8WOuZ-08BFgMyx-5RT
  2. A game programmed for a quantum computer (in python)
    https://medium.com/@decodoku/how-to-program-a-quantum-computer-982a9329ed02


Visualizing Machine Learning Algorithms for Root Cause Analysis

Researchers are currently trying to find out how to use machine learning algorithms for a smart factory.

One part of a smart factory is to combine the virtual and the real world in the use case of a manufacturing process. The machines and items that should be produced, are connected and the parts try to find their optimal route through the factory. Where this scenario mostly exists in scientific simulations, it is a good way to identify potential problems before using it in reality. The following graphic shows an 8×8 grid where we are producing tyres. The tyres (items) are moving autonomously on platforms and search their optimal route through the factory.

Technically we are talking about multi-agent systems, that exchange their routing information with their neighbor parts to share the optimal strategy. This strategy could be whether cooperative by optimizing a shared cost function or individual with a self-optimizing cost function. First, this sounds like reinforcement learning, where you try to use rewards, to learn the optimal route. Another interesting solution to solve that problem could be to treat the grid as an image and use Convolutional Neural Networks.

So now when we have our machine learning algorithm ready, a new problem arises. How can we identify potential problems? Congestion? Machine overload? Machine break-downs? At least we do not just want to identify problems, we want to identify the root cause. This process is also called Root Cause Analysis.

The usual solution to do a Root Cause Analysis would be to algorithmically search for the problem. But what if we do not really know after what we are searching? What do output parameters and numbers actually tell us? As humans are more graphically, the solution could be a graphical representation of the simulation. Combining that graphical representation of virtual reality further makes the task of Root Cause Analysis more interesting.

To establish a showcase, I worked on a project for the Root Cause Analysis in Virtual Reality combined with Amazon Alexa for speech recognition to make it feel more natural. The result is the visualization of a smart factory algorithm that allows analyzing the output data more intuitively by choosing simulation time steps, visualizing a heatmap, choosing different perspectives, show item details and item routes. The following video shows how the items are going through the factory, and how the heat map helps to identify congested routes in the algorithm.

Routing with NodeJS express applications running on Plesk/Windows/iisnode

Today I’ve tackled a really hard to find issue. I wanted to deploy a simple NodeJS Express application on a client’s Windows Server with Plesk.

Following the documentation at Plesk it is easy to configure and start NodeJS. The pain comes, when you want to use the built in routing of your Express application. When you configure a NodeJS application in Plesk, you have to select your startup script. This configures the URL rewriting for IIS so that the iisnode handler is applied to your startup script. Usually you want to use different files in routing, so you have to reconfigure URL rewriting.

The solution was posted on the Plesk forums. You have to edit the URL rewriting configuration in IIS so that the URL match is set to /* instead of ^$. So all requests are then forwarded to your startup script.

<rewrite>
  <rules>
    <rule name="myapp">
       <match url="/*" />
       <action type="Rewrite" url="server.js" />
    </rule>
  </rules>
</rewrite>

Professional Deployment of Alexa Skills based on NodeJS

Writing Alexa Skills for the Amazon Echo Dot is pretty easy. You can start with the templates at Amazon Developer Blog. When you finished, you simply upload your code to AWS lambda as a Zip file. For a one-time deployment this is straightforward, but if you want to develop a professional application and have multiple deployments it is not a good way. Also if you use a build system like Jenkins, an automatic deployment would be mandatory.

To face this issue, at least if you develop with NodeJS, you can use a tool called “ClaudiaJS” (https://claudiajs.com/claudia.html).
With a simple command (claudia update) your NodeJS based skill gets zipped and uploaded. So this tutorial is about the configuration and usage of that tool.

First of all to configure ClaudiaJS for Lambda deployment, you need to have an AWS account with IAM and Lambda.

  1. Login to your AWS account and choose IAM
  2. Create a new group with the privileges IAM full access, Lambda full access and API Gateway Administrator
  3. Create a user and attach it to the group you created before
    1. Tick “Programmatic access”
  4. In the review tab, you can see the Access key ID and the Secret access key – we will need them later

The next step is to configure your AWS credentials on your local machine

  1. Create a new folder under /Users/your-user/.aws
  2. Create a file named credentials
  3. The content of the file looks like (fill in the previously generated keys):
    [default]
    aws_access_key_id = your-access-key-id
    aws_secret_access_key = your-secret-access-key

If you finished that step, you can install ClaudiaJS

  1. Choose a folder where you want to create your new NodeJS application
  2. Open up a command prompt in that folder
  3. Type npm init
  4. Type npm install claudia -g
  5. Create a new file like server.js
    exports.handler = function (event, context)
    {
         context.succeed(‘hello world’);
    };
  6. Type claudia create –region us-east-1 –handler server.handler
    1. The handler, is the name of your file where is the entrypoint of your application. Like server.js or app.js.
    2. This will create a new lambda function and upload your content
  7. You can test if the creation succeeded by typing: claudia test-lambda
  8. For updates, you can simply use: claudia update

To use the new handler with Alexa Skills, you must select Alexa Skills Kit as trigger in the AWS lambda web console.
ClaudiaJS supports more tasks like defining tests or checking the logs. You can find the full documentation at https://claudiajs.com/documentation.html


Logging in the times of microservices, containers and clouds

When it comes to logging in cloud environments like OpenShift you often read about concepts only. Twelve-factor-applications, stateless containers, console or stdout logging. Everything nice. A point where the online sources get really spare is how to apply these concepts practically.

First things first, let’s do a short wrap up of the basic concepts and then about how to apply them practically in a cloud environment like OpenShift.

The twelve factor application (https://12factor.net) is a manifest that describes how to deliver software-as-a-service. The main concepts are

  • Setup automation, to minimize time and costs
  • Clean contracts with the underlying operating system to offer a maximum portability between execution environments
  • Suitable for deployment on modern cloud platforms
  • Minimize divergence between development and production, enabling continuous deployment
  • Can scale up without significant changes to tooling

OpenShift in combination with Docker and stateless micro-services is a very good choice to achieve the goals proposed for the twelve factor app. With docker and kubernetes, we can automate the setup and also enable continuous deployment. When we run our software in docker containers, we get a maximum on portability because it is just a container we can shift from one system to another without worrying about the underlying operating system. The OpenShift scaling mechanism in combination with stateless microservices enables automatic scaling based on a load balancer.

(more…)